Help
Hilfe:Benutzeroberfläche
Revision as of 12:34, 3 May 2019 by Sebastian Wallroth (talk | contribs) (Created page with "Du musst erst einen kleinen Test durchlaufen, um zu prüfen, ob Deine Technik richtig funktioniert. Wenn Du schon etwas auf Lingua Libre aufgenommen hast, kannst Du das ignori...")
Schritt 1 : Lege einen Account an
Die Sounds, die auf Lingua Libre aufgenommen werden, werden zu Wikimedia Commons hochgeladen. Wenn Du noch keinen hast, dann musst Du zuerst einen Account auf Wikimedia Commons auf der Seite commons.wikimedia.org/w/index.php?title=Special:CreateAccount anlegen.
Schritt 2 : Verbinde Dich
Um auf Lingua Libre aufzunehmen, musst Du mit Deinem Wikimedia Commons-Account verbunden sein, so dass die Sounds dorthin hochgeladen werden können. Um das zu tun, musst Du Dich auf Lingua Libre mit Deinem Wikimedia Commons-Account verbinden. Klicke auf die Figur rechts oben auf der Seite, dann auf "Einloggen auf Wikimedia Commons". Wenn Du noch nicht mit Wikimedia Commons verbunden bist, kommst Du jetzt auf eine Seite, die Dich nach Deinem Benutzernamen und Deinem Passwort fragt. Gib beides ein und klicke auf « Einloggen ».
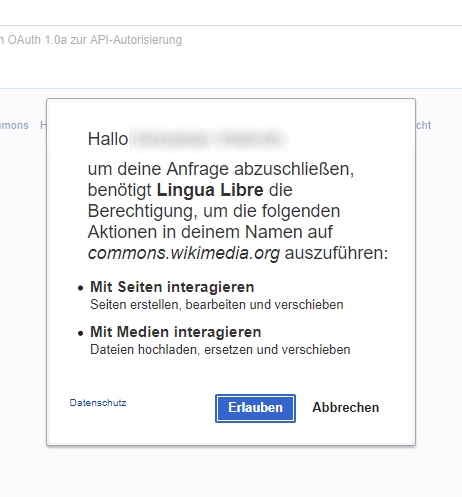
Wenn Dich Lingua Libre um Erlaubnis fragt, Dateien in Deinem Namen nach Wikimedia Commons hochzuladen, akzeptiere das bitte.
Schritt 3 : Prüfe Dein Matrial
Um aufnehmen zu können, musst Du ein Mikrofon haben, dass mit Deinem Computer oder Deinem Smartphone verbunden und installiert ist. Der Sound darf nicht zu laut und nicht zu leise sein.
Schritt 4 : Zugang zum Aufnahmeassistent
Klicke auf « Get involved » und dann auf « Record Wizard », um zum Aufnahmestudio zu gelangen.
Ein Fenster öffnet sich, das Dich um Erlaubnis für den Zugriff auf Dein Mikrofon bittet. Wenn Du mehrere hast, wähle das richtige aus. Dann musst Du auf « Allow » klicken.
Schritt 5 : Teste das Mikrofon
Du musst erst einen kleinen Test durchlaufen, um zu prüfen, ob Deine Technik richtig funktioniert. Wenn Du schon etwas auf Lingua Libre aufgenommen hast, kannst Du das ignorieren und einfach auf "Next" klicken.
Step 6 : Create a speaker
You can record your own voice or record someone else. But for every one (yourself or someone else), you need to create a speaker the first time you record him/her.
On the top of the "speaker" page, you have a drop-down menu with the name of the actual selected speaker. It allows you to change the speaker and create new speakers.
When you create a new speaker, you must enter :
- His/her name (you don't have to put the whole name, but you can't have two speaker with the same name)
- His/her gender
- The languages he/she spokes : click on the field "Spoken languages", start to pick the language name and click on the right one among the propositions. In the window that opens, indicate the the language level and the place of learning (city, department, region...). It's useful for people who study the geographical variation of a language prononciation.
- The place he/she lives (city, department, region...). It's useful for people who study the geographical variation of a language prononciation.
Click on « Next ».
Step 7 : Get ready to record
If the speaker you choose speak many languages, you have to choose the right one in the field "Record language".
To record only one word, pick it in the field with the label "Type a word ant press <Enter>" then press "Enter". If you want to record more than one word, you have to separate them with a #.
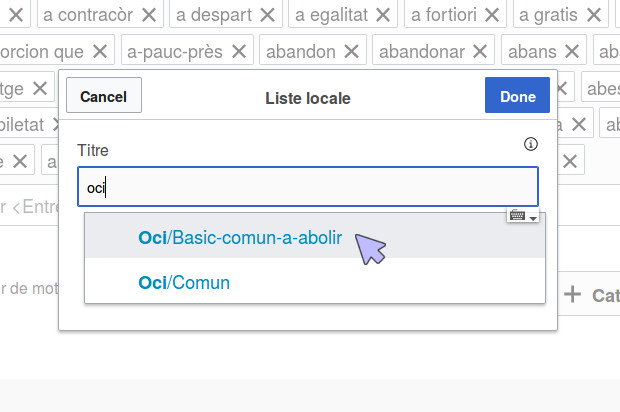
To record a list, you need to click on the button "+ local list". On the windows that opens, enter the language code ("eng" for english), then a slash (/), then the name of the list you want to record. When you have selected the right list, click on "Done".
You can remove words of the words to record with clicking on the "x" on the top right of the frame.
If you feel a little bit at ease with Lingua Libre, you can try to create your own lists. A help page explains you how to do this : Help:Create_your_own_lists.
It's a right thing to do to click on the "Shuffle list" before recording, especially if the list is long and if you're not sure to record it all. So everybody won't record the same words at the beginning of the list.
If you have properly configured everything, click on "Next".
Step 8 : record
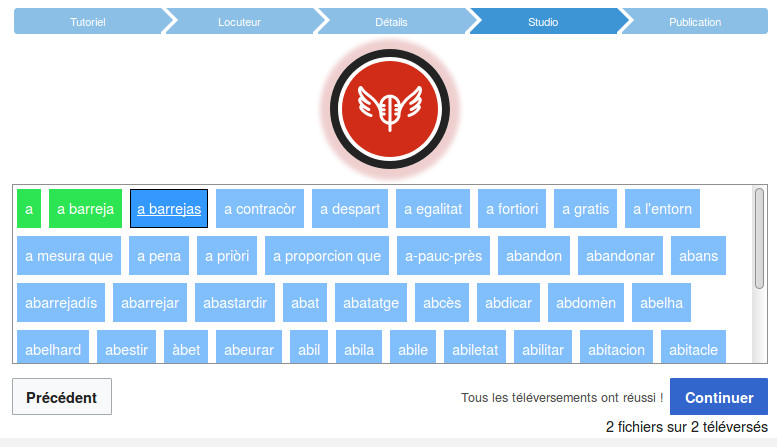
You are taken to a page with the words to record on blue squares. The big red button is used to record. It's brighter when you are recording, lighter when the recording is stopped.
When you're ready, click on the record button. The word underlined is the one you have to record. When a word is recorded, its frame become green. The recording automatically move up to the following word, which becomes underlined.
If you made a mistake, you can click on a word to record it again.
When you're done, click on "Next".
Step 9 : Check the records
You can then listen the records you've done before publishing them. To listen a record, click on the "play" button on its left.
If a record doesn't suit you, you can remove it of the sounds to publish in clicking on the cross on its right.
When you're satisfyied, click on "Publicj on Wikimedia Commons". Wait for the publications to be all completed (a green icon with a "v" will appear beside every sound). It's done ! You can now find your records on Lingua Libre, but also on the file bank Wikimedia Commons !


